“I went to the woods because I wished to live deliberately, to front only the essential facts of life, and see if I could learn what it had to teach, and not, when I came to die, discover that I had not lived.”
Henry David Thoreau
Introduction
This series of essays is an ‘after action report’ of sorts. It details the good, bad, and ugly of the gear I used. Furthermore, I’ll talk about the mistakes I made and the lessons I learned on my recent trip to the Bridger Wilderness and Glacier National Park. I’m choosing to follow Collin Fletcher and Chip Rawlins’ outline of The Complete Walker IV. But before I take you deep into those weeds, I should describe the trip itself. That information informed my decisions and mistakes.
“The Winds”
The Bridger Wilderness is part of the Bridger-Teton National Forest. It lies on the east side of the Continental Divide, demarcated by the Wind River Range. I met Ken, Arlyn, and Greg in Pinedale, WY. Jason met us in our first camp the next morning.
I went to academy with Ken and Jason. Arlyn — a detective in upstate New York — is Ken’s cousin. Greg, who also works for the Park Service, is a friend and former co-worker of Ken. We’ll hear more from them later.
Our longest day was just over 8 miles. The shortest less than two. (This was to move our camp to lower elevation in case the pending storm brought snow.) The trailhead is at about 9,000′ above MSL. Day one had us camping above 10,000′ and for the rest of the trip we were above that until the final day’s hike out. Knapsack Col, which we crossed on day three, is 12,380′ MSL.
Temperatures ranged from highs in the low to mid 70’s to lows in the mid 40’s. Thunderstorms, bringing lightning, rain, even hail in the late afternoon and evening, is always a possibility. It was ‘mostly sunny/partly cloudy’ except for day one and six when it rained. First lesson learned is wear sun protection as a rule and have it available to reapply. (More about that later.)
Last note about the area that should effect decisions is this is bear country. Both black bear and grizzlies roam here. That said, all we saw was a bull moose, a badger, pika, osprey, and a long tailed weasel.
Glacier National Park
My trip to Glacier National Park was much more mellow. There I met my friend Alison in Saint Marys. We had dinner with her retired Park Service friends Dick and Ursula. After dinner we drove to East Glacier Park and spent the night in the seasonal dormitory.
We spent the next day in Waterton Lakes National Park in Canada, after being detained at the border. (Funny story for another time.) Another night in the dorms, and then we visited several front country favorites of Alison’s. Late that day we drove back north — nearly again to the boarder — to the Belly River trailhead.
From there we hiked an easy 6.3 miles to the Belly River Ranger Station cabin(s). Alison patrolled and I hiked and fished for the next two days. I hiked out solo on the fourth day. Then, via the ‘Going to the Sun Road,’ drove west. I eventually meet my wife and friends on Whidby and Bainbridge Islands in the Puget Sound, Washington.
Since I was staying in a ranger cabin, pack weight was very low but there is still some information to gleaned. There I used a different pack. See full details in ‘chapter 2.’
I ended up driving a total of 3,574 miles over eleven days.
The Trip Numbers
8/20: drive to Elko, NV
8/21: drive to Pinedale, WY
8/22: 6.14 miles from the Elkhart/Trails End trailhead to Barbara Lake (about a half mile shy of our target, Hobbs Lake)
8/23: 8.59 miles to Titcomb Lakes (we camped between #3 & 4) beneath Fremont Peak
8/24: 5.18 miles up and over Knapsack Col
8/25: 1.66 miles dropping roughly 1,000′ elevation, just above Peak Lake (late afternoon hail, and then rain, and then rock fall off Cube Rock)
8/26: 5.56 miles over Shannon Pass back to and then south on the Continental Divide National Scenic Trail to Lower Jean Lake
8/27: 7-8 miles estimated (more details later, but my watch was dead until I could charge it at lunch)
8/28: 6.83 miles back to Elkhart/Trails End trailhead
8/29: drive to Bozeman, MT
8/30: drive to East Glacier, MT
8/31: short hike to the top of Bear Hump in Waterton Lakes National Park, Canada
9/1: less than 3 miles in Glacier National Park front country, and then 6.3 miles into the Belly River Ranger Cabin
9/2: hike and fish
9/3: hike and fish
9/4: hike 6.3 miles out to the Belly River trailhead; drive to Spokane, WA (where I shared an elevator with Bonnie Rait!)
9/5: Drive to Whidby Island and met Kathleen and friends
9/6-8: Enjoyed ‘island life’ and a little bit of the city — Canon, in Seattle, WA (huge thanks and love to Nettie, and Carrie and Kurt for hosting us)
Throughout my 23 years as a federal law enforcement officer, I spent roughly ten years as a field training officer. What follows are books that I found helpful in my career. I must admit I did not pass all these down to all the recruit trainees I mentored—some of the books I didn’t know about soon enough, and some were not written yet—but I wish I had.
The 7 Habits of Highly Effective People
This book by Stephen Covey is the first ‘self-help’ book I ever read. I came to it through the Middle Leader training program (@Mike Wood) in the Forest Service. I had always assumed it was a business book. Fortunately, it’s not about that at all.
Covey’s main point is that you must learn to lead and manage yourself through principles before you can lead others. (If you want the business stuff, see Covey’s book Principle-Centered Leadership.) I wrote a series of articles on my website that discuss similar ideas. I borrowed liberally from Covey.
As Jim Collins writes in the forward, “Covey set out to write a book, not on building great organizations, but on achieving great personal effectiveness. Still, organizations are composed of people, and the more effective those people, the stronger the organization.”
“The 7 Habits are not a set of piecemeal psych-up formulas. In harmony with the natural laws of growth, they provide an incremental, sequential, highly integrated approach to the development of personal and interpersonal effectiveness. They move us progressively on a ‘Maturity Continuum’ from dependence to independence to interdependence.”
Jim Collins, Introduction to The 7 Habits of Highly Successful People
Leadership Strategy and Tactics Field Manual
A law enforcement professional is a leader regardless of title or rank. In all-risk incidents, they are often the initial incident commander, tasked to bring calm to VUCA situations.
Retired Navy SEAL Commander Jocko Willink distills the lessons learned from his twenty-year career. It’s an easy read using real ‘war stories’—you might forget you are learning something.
“While garnering an understanding of the concepts is fairly simple, sometimes it takes more. A leader must understand the strategies and tactics needed to actually implement these principles—how to pragmatically put the principles to work. He or she must understand the strategic foundations on which the principles are built and the core tenets that comprise those principles. Then the leader must understand the tactical skills, strategic maneuvers, and communication techniques used to employ the principles of leadership. That is what this book is about.”
Jocko Willink, Leadership Strategy and Tactics Field Manual
It all starts with how to be a good team member and follower. From there, Willink shows us how to succeed as a new leader. I find it to be a better starting point for new officers than Willink’s first book, Extreme Ownership.
Emotional Survival for Law Enforcement: A Guide for Officers and Their Families
My analogy for law enforcement stress is an ice cream cone—the cone is ‘life’ and all the normal stressors that anyone can experience, with three scoops of special law enforcement flavors:
Personal
Operational
Organizational
The academy and field training should help you learn and practice how to deal with operational and critical incident stress (at least in the moment). Whether and how well they do this is a longer discussion for another time. Doctor Gilmartin wrote this book to help you with the emotional impact of the whole dessert every day for twenty-plus years.
“This book is designed to help law enforcement professionals overcome the internal assaults they experience both personally and organizationally over the course of their careers. These assaults can transform idealistic and committed officers into angry cynical individuals, leading to significant problems in both their personal and professional lives. Officers and their families can experience a law enforcement career as emotional survivors instead of falling by the wayside as victims of predictable and preventable challenges.”
Kevin M. Gilmartin, Ph.D., Back Cover
When it comes to law enforcement psychology, author Kevin Gilmartin is the GOAT. He spent 20 years as a law enforcement professional before becoming a clinical psychologist. In less than 150 pages, this book reads like a conversation or small, informal seminar with the author. Gilmartin is plain-spoken; he doesn’t mince words. This is not new agey, pop psychology. Nor does it need a psychology degree to understand.
One caveat: Gilmartin’s primary solutions, or as he puts it, “How to become an emotional survivor,” are presented in the last 30 or so pages. First, as is mentioned throughout the book, is knowledge of the problem. Go back and read the first 110 pages if you didn’t catch on the first time. Second, when leaving work, you need to “turn on something different.” That is to re-engage in hobbies, friends, and family as you did before you became a police officer, so that your identity is not one-dimensional. Lastly, “Survivors practice aggressive [proactive] personal time management and goal setting.” Another solution hinted at but not thoroughly discussed is “for officers early in their careers to be trained in what it takes to maintain a sense of control in their personal lives.”
These solutions may seem shallow at first glance. These are important solutions, but not enough. The primary thing missing is how to develop a practical philosophy and then a strategy for which each of these solutions is one of several tactics.
Mindful Responder, The First Responder’s Field Guide to Improved Resilience, Fulfillment, Presence, and Fitness—On and Off the Job
Speaking of tactics for emotional survival…
Even though I have practiced informal mindfulness for 9-10 years, and formal meditation for eight, I find it hard to explain the benefits to recruit trainees. It took me a long time to go all in (and a big thanks to my coach Michelle for constantly needling me to try). I can only say I wish I had started sooner.
“To truly succeed in life’s crucible moments, to flourish throughout the inevitable peaks and valleys we all face—this requires that we acquaint ourselves and grow comfortable with stillness, silence, and non-action. I began to see that action and non-action aren’t opposites, but are in fact complimentary.”
Greg Amundson, Introduction to Mindful Responder
In less than 160 pages, Crawford Coates packs in information about:
Practical mindfulness
Positive psychology
Resilience
OODA loop
Polyvagal theory
There are practical exercises throughout, and a “schema for progressive practice” in the appendix. Bonus: the author quotes Melville—
“Is it not curious, that so vast a being as the whale should see the world through so small an eye, and hear the thunder through an ear which is smaller than a hare’s? But if his eyes were broad as the lens of Herschel’s great telescope; and his ears capacious as the porches of cathedrals; would that make him any longer of sight, or sharper of hearing? Not at all. Why then do you try to ‘enlarge’ your mind? Subtilize it.”
Herman Melville, Moby Dick (emphasis mine)
It’s a good primer for the practical aspects of mindfulness without the hippy-dippy-trippy naval-gazing. If all you get out of it is some parasympathetic-dominant downtime, it would be well worth it. It is the perfect accompaniment to Gilmartin’s book.
The Elements of Style, 4th Edition
Writing anything ‘well’ is hard. Writing law enforcement reports can be doubly so. Ten years as an FTO, and 14 years of reviewing probable cause statements and incident reports of non-commissioned officers* has taught me that. In law enforcement and investigation reports, you will need to present the fact pattern and evidence in such a way as to convince others that your actions were the best course.
Done well you use all three modes of persuasion:
Ethos – credibility, trust
Logos – logic, reason, proof
Pathos – values, emotions
The trick is to tap into the pathos of the reader, without stating your emotions or applying value judgements. How? “Properly composed, concise, concrete, vigorous writing that admits no doubt.” And unless things have changed, this is not taught at the Federal Law Enforcement Training Center.
But there’s help. In about one hundred pages first written in 1919, by William Strunk, Jr. and updated by E.B. White in 1979, you learn how. The fourth edition was published in 2000.
“Vigorous writing is concise. A sentence should contain no unnecessary words, a paragraph no unnecessary sentences, for the same reason that a drawing should have no unnecessary lines and a machine no unnecessary parts. This requires that the writer make all sentences short or avoid all detail and treat subjects only in outline, but that every word tell.”
William Strunk,Jr.
Elements of Style includes:
Rules of usage
Principles of composition
A list of commonly misused words and expressions,
A “few matters of form”
Do yourself a favor. Take this small book to Staples, OfficeMax, of some similar outfit and pay to have the binding changed to spiral or coil bound. You will find yourself returning to this book as a reference. My copy’s binding started falling apart on the second read.
*Non-commissioned officers writing probable cause statements and incident reports? Yes. It’s a Forest Service thing. They are called “Forest Protection Officers.” With only 40 hours of training, any Forest Service Employee can take enforcement action for petty violations on Forest Service Lands, including issuing citations. And, no, they do not have defensive gear, so yes, it can be dangerous. Nor do they have arrest authority (despite the fact that “promise to appear” and “issued in lieu of arrest” and they detain suspects long enough to run their license and registration and issue the citation).
There you have it. Five books that I promise will help you in your career as a professional law enforcement officer. Have a book you think should be on this list? Comment below.
Every trip into the backcountry requires you to either carry all the water you will need for the duration or to purify water along the way as need … and IF available. So, it’s good to know how much you will need for any specific length of trip. This tells you:
how much you need to carry, and as such how much that’s going to weigh
how much you need to filter, which might inform decisions such as what filter to use
how much you need to treat, indicating how much treatment you need to bring
how much you need to boil, which translates into how much stove fuel and maybe your stove choice.
Calculating Water Needs
Most references agree on the necessity of about two liters of water per day. This does not take into account water loss from exercise, work, or heat of the environment. But you can calculate that too. Most healthy adults at rest should consume 8oz for every hour of the first 10 hours of the day.
Don’t pound 8 oz every hour. This can be counter productive, especially if you are already mildly dehydrated. Sip the amount over the 1 hour period. The gulping method could lead to acute overload and then elimination. The body perceives you are fluid overloaded and wants to bring you back to stasis.
To avoid dehydration during exercise, you can get more accurate calculations using the “Galpin Equation.” “Galpin” is Dr. Andy Galpin. He didn’t name the equation or even actually develop it. As an inside joke, Professor Andrew Hubberman named it after him. Listen to the podcast here.
The Glapin Equation:
Your body weight in pounds divided by 30 equals the number of ounces of water you should consume every 15-20 minutes. This replaces the 8oz:1-hour protocol.
The military has done extensive research in this area. They are very concerned about having enough water to keep soldiers working at peak levels.
According to the Army backpacking, or “rucking” as they call it, is either “moderate” or “hard” work. Next they measure “wet bulb globe temperature” (WBGT) which takes humidity into account. This is also referred to as the “heat index.” If you have ever heard of “black flag conditions” that’s a heat index of >90 degrees Fahrenheit.
From that we get fluid replacement guidelines for each heat index and and work category. They also calculate “work/rest” periods.
Back In the Day…
In the past I have relied on chemical solutions, such as:
This was an upgrade from my Appalachian trail days method of “drink and hope for the best.” Chemical solutions are somewhat slow but very light weight and treat a lot of water for their small size. I ALWAYS have some of one of these in my kit. It’s faster and uses less energy than boiling.
I’ve also used pumps in the past, like this old school “First Need XL.”
This filter is still made by “General Ecology” [LINK] and is quite bombproof. It pumps fast and has a useful, albeit slow, gravity filtration capability. It weighs in at 2.3 pounds and the filter needs replacing replacing after 180 gallons (550 liters). The filter replacements cost a whopping $75, coming out to $2.40 per gallon!
Moving Forward
For my Wind River Wilderness trip I decided to try something new. That is something small, light, and easier. I’m going to test two filters: the Life Straw Peak Series and the Sawyer Mini.
On paper they are very similar with one marked difference. The Life Straw filters and incredible (compared to the First Need, anyway) 1,000 gallons (4,000 liters). The Sawyer Mini beats that by a factor of 100. It promisses to filter an overwhelming 100,000 gallons before needing replacement. The Life Straw has a replaceable filter. The Sawyer does not allow for replacing the filter.
Why not carry both? I’m not going to need to filter 1,000, much less, 100,000 gallons on a six-night trip. But at only 2oz, I can carry both and test them across the seven days to see which is the most convenient. Whichever one doesn’t make the cut for backpacking can end up in a vehicle emergency kit.
Speaking of vehicle emergency kits, I got a four pack of theses recently at Costco. Filters 1,000 gallons each but does not allow for filter replacement. Nor can they adapt to water containers like their more sophisticated (expensive) twin.
Unboxing
As I unbox these a few things stand out.
The life straw looks like it was designed by Sir James Dyson (he does like things that suck and blow). It’s sleek, simple, modern, all the bells and whistles hidden away. It’s a bit long but still fits on a pack strap or in an accessible pocket.
The Sawyer appears to have been well engineered to function but not to display on your coffee table. It looks more like that hard to get to part on an old diesel tractor engine that never seems to break. It is a bit thicker but shorter and would fit on a pack strap or in a pocket.
The Sawyer comes with a “cleaning plunger,” a drinking straw, and a small (16oz) water pouch.
Put water in the pouch, screw on the filter and drink (squeezing the pouch makes things go faster).
Using a standard plastic water bottle size and thread, the Sawyer and the Life Straw can both be used this way.
The Sawyer’s straw is hard to fit and very tight. Which is good, indicating it would be less likely to fall off and float away in the creek you are drinking out of. But the straw is plastic and I suspect would stretch out and get loose over time if not crack and split. For this reason I’ve already swapped it out for a food-grade silicone drinking straw. The silicone replacement is longer and more flexible, so drinking out of mud puddles will be easier.
Oh! and it fits on the Life Straw too.
Now the Sawyer “cleaning plunger” seems to be an afterthought. Like they made this cool filter and at the last minute someone asked “how do we clean it?” And someone else said, “lets buy some 50mL syringes from a local medical supply, put our name on the side, and put that in the box.”
Result? A hunk of nearly useless plastic (it could be repurposed to irrigate wounds) that doesn’t fit on the filter. So you want me to hold the syringe on the filter, while also plunging water from the syringe through the filter? I’m not saying it can’t be done but…
The syringe could have been engineered to fit onto the filter. Or Sawyer could have supplied an adapter (I tried both their straw and mine to no avail).
I’ll leave the syringe at home and use my mouth to back-blow air and water through the filter.
Bladders or Bottles?
There’s pros and cons to both bladders and bottles, and I’m sure there is endless debate to be found online. Here’s my thinking.
Bladders are convenient
Fill it, close it, put it in the pack, route the hose, drink as you go. Almost every pack on the market these days has a bladder or “reservoir” pocket and openings to route the hose. Several outdoor gear companies sell their own version of water bladders.
Camelback used to have problems with the screw closure. I would get them cross-threaded, and could never get them tight enough, leading to leaks. This has greatly improved.
As far as closures and fill openings, I am a big fan of the HydraPak and Source. They have large-mouthed openings and easy to use, leak-proof closures.
Several brands have ‘quick-disconnect’ hoses and or mouth pieces. And there seems to be some standardization. My HydraPak and Source hoses fit on Camelback bladders and vice versa.
The HydraPak and Source bladders readily crossover. In fact they are almost identical. The small differences are more akin to target audience than function. The HydraPak appealing to the backpacking crowd. The Source more appealing to the military (both the real and the “soldiers of fiction”). Update: Source has separate”outdoor” and “tactical” line of products.
Because bladders are tucked away into the depths of the pack or carrier, they aren’t visible. It’s impossible to know how much you have actually drank or how soon you need to refill them. They do tend to carry more water than a single bottle (2-3 liters), but knowing how much you have consumed requires pulling them out of the carrier.
Lastly, bladders can be hard to fill. It can be done with patience, but its not as easy as a ridged wide mouth bottle. Two people make filter pump filling easier. So too having a tree handy near the source from which you can hang the bladder.
Bottles are multi-functional
Bottles come in all shapes and sizes. They can be as small as 8oz and as big as 36oz. Palstic, glass, and metal. There are double walled aluminum versions from HydroFlask and now Yeti. These profess to keep your tea hot or your water cold longer.
Nalgene is the GOAT of water bottles. Again in multiple sizes, colors and decorative art, and small to wide mouthed.
I have a few old Sigg water bottles that look exactly like stove fuel bottles so be careful there.
I’ve never tried “Kleen Kanteen” or any of the glass bottles that were all the rage several years ago.
Measurements on the side allow quick reference to when to refill or how much you have drunk. It also comes in handy for mixing the right amount of water into your dehydrated meals. Mixing powders seems to taint most bladder materials. Not so much the new plastic, glass, and aluminum bottles don’t seem to have this problem?
To drink on the trail you must have them stored in an outer pocket on on the hip belt. Thankfully most packs have these pockets built in as they do the bladder carrier.
I find bottles, given their ridged nature to be easier to fill. In dirty, gritty water I’ll stretch an old (clean) liner sock over the mouth to catch the worst of it. This is something I haven’t quite figured out how to do with bladders. One exception is my MSR Dromedary, which has a ridge wide mouth opening much like a bottle.
Any reason to carry both?
Sure. If you are certain that there will be water “everywhere” you could carry a bladder for use in camp due to the volume of water it holds. This would be empty during your hike. Why? Weight.
The bottle hold less and you can easily eye when it is getting time to refill. The full 32oz water bottle on your hip weighs less than the full 2-3 liters buried in your pack. I have a friend that professes this system to be best.
I haven’t had a chance to experiment yet with the newer gravity filtration systems. These might work perfectly for my friend’s system mentioned above. The hoses are oriented specifically to accommodate gravity feeding, and so would not work well for drinking on the move.
Accessories
With my new new filtration method, and a propensity to make gear as multi-functional as possible, I’ve recently found a few accessories to be very handy if not flat out necessary.
I bought this pack of adapters and hoses from “Source” and this set of quick-disconnect (QD) adapters from HydraPak. Remember above that Source and HydraPak can crossover hoses from one to the other? The QDs work on both bladders.
This QD male end is designed to fit the Sawyer Mini water filter. And yes, due to the standard size and thread, it fits on the Life Straw too.
Now I can attach a hose to a pack mounted water bottle, and a filter to that. There’s the convenience of a bottle that’s easy to reference, and a ready-at-hand, strap-mounted drinking tube.
And I can attach either filter to a hose for in-line filtration on the go, and mount that on a shoulder strap for easy drinking. I can even use my large Dromedary as a make shift gravity filtration system. It’s not perfect, given the side orientation of the mouth, but it does work.
Given all the options I now have, there’s lots to test and experiment with on my upcoming trips. Stay tuned for updates.
The foundation of all hiking forays or backpacking adventures into the wilderness is your feet. Thus equipment decisions should start with a good pair of shoes.
What I’m Not Using & Why
I’ve never hiked in sandals for fear my ankles won’t be up to muster. I used to conduct day patrol of wilderness areas around Tuolumne Meadows in Yosemite National Park. Then I preferred Solomon trail running shoes. On the Appalachian Trail in the early nineties, I went through three different pairs of shoes, now not worth mentioning.
In the Wind River Range and in Glacier National Park, I’ll be hiking over rough, uneven terrain, including some off trail. I’ll be carrying around 35 pounds of food, water, and camping gear. There’s also some opportunity for ‘peak-bagging’ along the way. Therefore I’ll be wearing a study pair of boots.
My Wesco 10 inch, ‘roughout’ fire boots served me well for 12 years of fire investigations.
Before that it was a pair of 8″ Whites fire boots, which I wore on duty, so polished to a high shine before every shift.
The Whites were originally light camel-brown. I stripped and redyed them to cordovan–the Park Service uniform standard. In 2009 I repeated the process to black, so to match the US Forest Service uniform standard.
These boots were great in that they made me look taller (ha!) and firefighters always look at and judge a person by their boots, or lack there of… First they saw that I could suffer in these heavy, unnecessarily high-heeled monstrosities. Then they could make fun of me for not working hard because my boots were shiny! Respect and self deprecation all in one glance!
But traditional fire boots, with a ‘logger’s heel’–no matter what some 20-year, grizzled Hot Shot Superintendent might try to tell you–are NOT built for long, multi-day hiking. Nor are they suited for mountaineering of any sort. (I’ll do another post rant debunking the myths of how great fire boots are.)
I have an old pair of La Sportiva’s “Trango 2.” I got these secondhand from a friend that was upgrading their kit and didn’t like the feel of these.
Having a very stiff metal shank for crampons, a wedge- raised heel to help keep your weight above your toe points, and a smaller toe box to help with toeing in on rock, these boots are designed for mixed, alpine rock and ice climbing. You could (and I have) used them for the approach to and descent from ice climbs. I have also used them in one-day assaults and reclamations of illegal cultivation sites. Bottom line, my feet are ‘dog tired’ after hiking in them all day.
So What Then?
I’m left with a decision between my La Sportiva Karakorums or my Danner Mountain Lights. Why am I still debating these two? Let’s look at the pros and cons of each.
La Sportiva Karakoram
The La Sportiva website describes the Karakorams as a
“versatile mountaineering and backpacking boot perfect for light-duty mountaineering, heavy-duty hiking and backpacking or various types of outdoor work situations where you need durable support and all-day comfort.”
It was for “outdoor work situations where you need durable support and all-day comfort” that I got them. La Sportivas have always fit me well. I was aware that some Forest Service Smoke Jumpers have been using a similar boot–the “Glacier WLF”–to hike out pf the deep wilderness areas they are dropped into. The Glacier WLF is insulated (bad, more on that in a minute). They are built on the “Makalu” last, similar to the old Trango 2 (good). They have a nylon shank (more flexible for hiking, not quite stiff enough for ice climbing, also good). The Makulu is also insulated (bad). The Karakorams are not insulated (good) and also built on the Makalu last (yay!).
SIDEBAR: why is ‘insulated’ bad?
Reynaud’s Syndrome, maybe, sort of, or maybe not…
My feet sweat a lot–hyperhydrosis. And due to a previous mistreatment of ‘frost nip’–yes, that’s a real thing–I have poor circulation in my toes. In even warm climates my feet get moist from perspiration overwhelming the socks’ ability to transport moisture. My toes respond by clamping down what little bit of capillaries I do have there. Then my toes go cold and will stay that way until I change socks and rewarm them. If the boot is damp, i usually need to change them too. All the insulated boots I have ever used seem to make this problem more profound. They seem to decrease breathability and hold more moisture, the insulation acting as a perspiration sponge.
Work and play on the west side of the Sierras and the foothills is hot and dry, and rarely am I all day in cold wet snow. In those conditions I usually wear pack boots (I love my Sorels for this) and carry extra socks and felt liners.
By the way, my experience has been “GoreTex” liners create a similar problem.
My Experience With the Karakorams
I’ve had the Karakorams for about six years now with only one problem. The first time I wore them was in wet conditions and the right book leaked. I was working an over-the-snow ‘poker run’ checkpoint … in the rain … which was melting the snow that otherwise covered the asphalt. It was like I was standing with one foot in a bathtub for several hours before I was able to change them out. I swapped them out for my Sorels and fresh socks–always in my patrol vehicle winter clothing kit.
When I got a chance to troubleshoot them I discovered several locations were the sole was not glued to the rubber rand. My local cobbler (more about Arsen later) fixed the problem with fresh glueing. I haven’t had a problem with them since.
All day repetitively walking up and down steep, sometimes terraced, rugged terrain, wearing up to 20 pounds of gear, and choping, stacking, and dragging… and nary a hot spot. Tough, durable leather, with a semi-flexible nylon shank, needed zero break-in. I haven’t experienced any ‘bite.’
One downside is weight. A solid four pounds a pair, so two pounds per foot. According to this article over at Mountain Tactical Institute, one pound on your feet equals five pounds on your back. Which in turn equates to five percent more energy expended. Its a trade off you should be aware of.
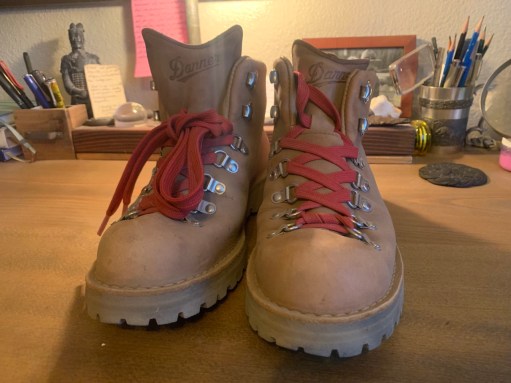
What About Those Danner Mountain Lights?
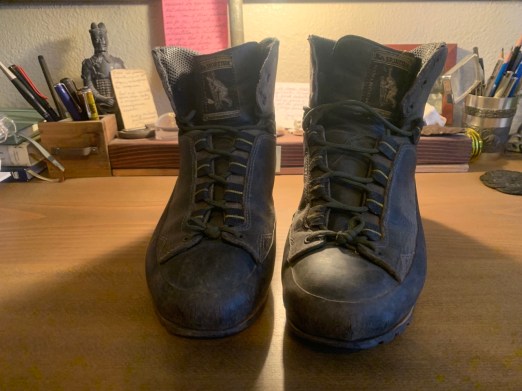
First of all they are gorgeous aren’t they? Classic single piece of leather in “Clovis” tan with a stitched down ‘Norwegian welt’ construction. And that pop of red in the laces? Wow! I’m serious–in an old-school mountaineering sense these are sexy. Speaking of laces, Danner provides both flat (my preference) and round laces with your purchase.
Though I’ve only had these for two years and haven’t used them much, the construction and leather, backed by Danner’s over 90 year history of making boots, I’m certain they would be durable for many a hike … if …
But herein lies the rub. So far on every training hike in these boots, from three miles to ten, with a fifty pound training load, I’ve ended up with blisters on both feet in the most curious of locations–that narrow land between the ball or forefoot and the first toe joints.
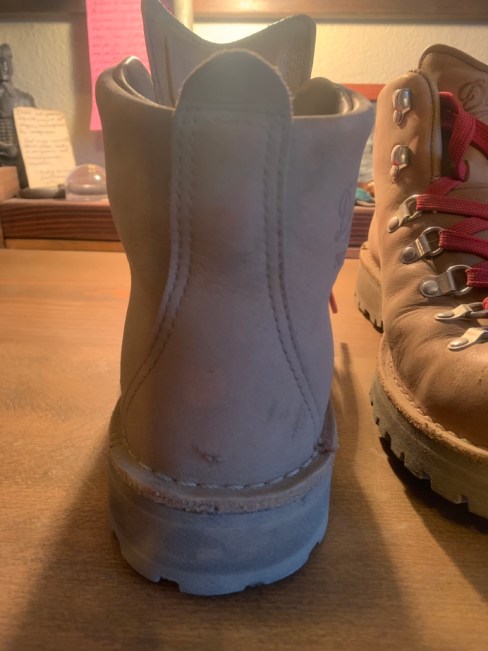
But before I got far enough to get blisters I was having another problem. I was experiencing boot bite on my Achilles tendon on both feet/legs–where the top of the ankle cuff met the tendon. Though well padded, and despite thick socks, and even when leaving the top hook-style eyelet undone I got boot bite.
See that strip on leather going down the heel? And that seam of rolled double leather at the top?
This seems to be creating the problem–multiple pieces leather and layers of stitching.
Googling the problem led to an unexpected solution at Boyers Boot-N-Shoe’s “Ask the Boot Guy” blog. Try “breaking them in with a baseball bat!” This actually did work with one boot but not so much with the other. And I ran out of leather conditioner.
I went back to “Georgio and Son’s Botega” to show the problem to Arsen Sheklian. Arsen said, “leave them with me; I have the perfect tool.” Enter the “Warnco Rol-Eze Model AW.”
… A week later I picked up the boots and that afternoon hiked about five miles. The bite was all gone.
Now back to those curiously located blisters…
Here I learned they are “distal forefoot blisters” (duh). Apparently, “weight bearing forces in the [ball of the foot] push the blister fluid to the mush less weight bearing [distal] area.” So, I need to focus my prevention on the ball of the foot.
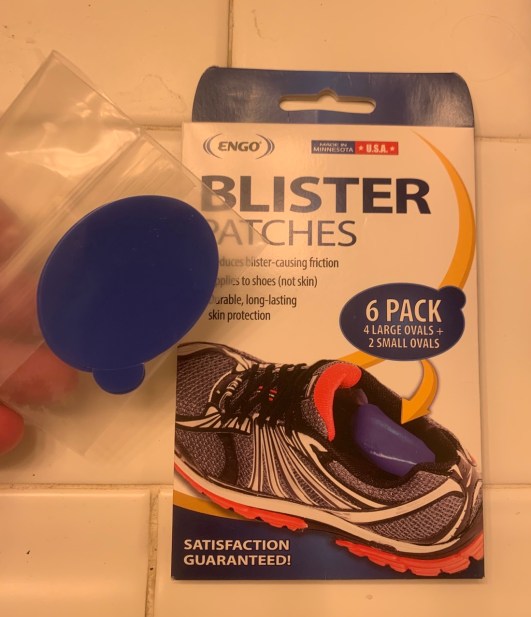
I’ve put “Engo Blister Patches” inside the boots.
I wear a double sock system, and I have been greasing up the offending area of the foot with Body Glide [pic]. I’ve also been applying rubbing alcohol to the soles of my feet (not too much too often or they will dry out and crack, yikes!). And walking around barefoot as much as possible to build some callouses.
So far I’m still getting blisters. But here’s something,
“there are more sweat glands on the sole of the foot compared to other areas and this contributes to high friction levels.
“It’s warm and humid in your shoe. That means high friction levels–things are clammy and sticky.”
Rebecca Rushton, BSc(Pod)
Remember when I mentioned my dislike for insulation? The Mountain Lights aren’t insulated (according to Danner’s website). But they are ‘GoreTex’ lined. The GoreTex liner has proven to be not breathable in the hot and dry temperatures I’m training in. I should have bought the non-GoreTex version.
Single piece leather construction, with a leather liner or no liner, treated well with “Sno-Seal” or Hubbard’s Shoe Grease (my favorite) is inherently water-resistant and breathable.
Indeed, carrying less weight and slowing my pace can also reduce blister potential. I might also try foot powder to help keep my feet dry.
The Verdict
I am going to take the Mountain Lights for day hikes in Glacier National Park. But unless I can correct my mistake of purchasing GoreTex lined Mountain Lights in the next several weeks, I’ll be trudging through the Wind River Range in my trusty La Sportiva Karakorams.
Perfection is achieved,” according to Antoine de Saint-Exupery, “not when there is nothing more to add, but when there is nothing left to take away.”
The Lesson of “Light and Fast”
On October 16th, 2004, while I chatted aimlessly with a local firefighter in my Yosemite National Park employee housing, a man with a propane torch and a revolver was threatening hikers and starting fires in Tiltill Valley. The park’s Special Response and Tactics Team was called up to the Hetch Hetchy area to be deployed to the backcountry trails around the arsonist. I and three other rangers were inserted by helicopter above Tiltill Valley. We were to hike down to one of the trails leading out of the valley, and set up a trail block to make sure the suspect did not escape.
In my new backpack, just for these types of missions, I had packed, well, everything. Sleeping bag, pad, tent, stove, fuel, water, food for two days, and excess clothes “just in case.” Hiking in was easy enough downhill. Once we found the trail and a good location for a trail block, I realized I carried all this for nothing. The fire now filled the valley and if it took a hard fast run at us we were going to need to run for it. No time for tents and sleeping bags and all that nonsense. We all stayed up through the night watching the fire and waiting for the suspect.
Fortunately, down canyon winds kept the fire in the valley. The arsonist was identified as the lead suspect of the murder in southern California of his wife, daughter, and step-daughter. We learned later the next day that he had taken his own life sometime that night.
At sunrise we started our hike out to the helicopter pick up. Overburdened as I was, the hike up was slow going. As I was holding up our progress, others offered to carry stuff for me — how embarrassing. Lesson here is mission first and comfort is relative; light and fast is the way to go.
There is Such a Thing as “Too” Light
Aristotle said “virtue is the golden mean between two vices, the one of excess and the other of deficiency.” We’ve just discussed my lesson of excess; let’s look at my vice of deficiency.
In the fall of 2006, still in Yosemite, but this time on the south end near Wawona, I was conducting a boundary patrol with another law enforcement ranger. As was common practice then we were wearing green BDU pants, grey tee-shirts, and green ball caps with a gold badge emblazoned on the front. Fearing nothing but poison oak on the cross-country bushwhack we left behind our cumbersome full duty belts and ballistic vests, opting instead for day packs and holstered side arms.
An hour and a half in and over four miles from any roadway, we found ourselves literally up to our eyeballs in the first clandestine outdoor marijuana cultivation site in Yosemite’s history. A few minutes later, though our cover-move tactic was sound, we inevitably found ourselves chasing armed felons through the plantation with nothing but air and opportunity between us and a bullet. Fortunately for us they disappeared into a steep drainage. We found three different calibers of pistol ammunition, two calibers of rifle ammunition, and 12-gauge shotgun shells in their camp.
From that day on I never patrolled the backcountry without a ballistic vest and duty belt with enough gear to affect an arrest — handcuffs, and one or two modes of less-lethal use of force.
I have two amendments to this principle: (1) if I’m carrying a firearm, I’m also carrying a gunshot wound trauma kit, and (2) train to operate in the backcountry with the extra weight of the vest and belt.
Be Prepared and Active
November of 2016, now working for the US Forest Service, I was short-hauled into yet another illegal cultivation site as part of a team of eight. I was paired up with a grizzled sergeant from the local county Sheriff’s office. He’s a bit surly but an outstanding tracker and woodsman. On the edge of the site, he got onto a track that he estimated was ‘fresh’ — probably used by two suspects fleeing the helicopter recon just three hours ago. Odd enough it was not headed towards the closest roadway as is usual for ‘escape routes.’ We decided to follow the track.
Several hours later, we crept quietly into another plot that had not been discovered or reconned by air. It was mostly processed, not occupied, and had a small abandoned camp kitchen. When we radioed in our location and findings, back came the bad news, “no short-haul out; the helicopter starter went bad and needed replacing.” We were stuck.
Given the option of hiking out in the dark over unknown terrain with the possibility of armed suspects hiding nearby, we decided to spend the night. ‘Sergeant Surly’ made up a fire. I rigged a reflective lean-to from an oversized space blanket. We both put on our ‘snivel gear’ (see kit lists), and then shared an MRE I had brought and a can of Spam Sergeant Surly had found in the camp.
The rest of the night we took turns stoking the fire and dozing. Come sunrise we drank instant coffee, split a Cliff bar and started back to the main cultivation site. We were short-hauled out before noon, both tired but grateful to have prepared ahead for an unplanned bivy.
Every Day Carry (EDC)
Every Day Carry. These items are always in my pockets or on my person:
pocket knife (old school Case, three blades)
space pen (brass)
flashlight (Olight i3T EOS, brass)
Zippo lighter (also brass, it was my grandfather’s).
Handkerchief
Money clip with cards and driver’s license
Watch (Garmin Fenix 6X Pro)
Keys (to gates and such on my district, I have a truck lock fob hidden in my vest so I lock all the extra keys in the vehicle when I walk off into the woods)
Mobile smart-phone with base maps of my area of operations downloaded (I prefer the Avenza app as USGS quads are typically free; this is my camera, comms in some areas, GPS, and evidence notes collection point)
Personal Protection & Duty Gear
In the back country I am using rifle plates in a carrier made by US Palm. The back plate carrier is actually a day pack on shoulder straps. This set up allows me to pack essentials (water and food, weapon cleaning kit, and for HAZMAT: goggles, mask, and gloves) in the back carrier, and I am able to take it off if needed, like when driving the patrol truck. Here too is a military poncho. There is also a “beaver tail” type flap that allows me to stash a poncho liner (Kifaru ‘Woobie’) if needed, or my helmet when it’s not needed. The back carrier is low volume so I can’t over-pack it with stuff I don’t need for a day mission and if needed I can carry a larger ruck on top of it.
The front carrier has spare rifle and pistol magazines, a drag strap, gunshot wound trauma kit, radio comms, some admin items (pen, pencil, small notebook, maps, compass), flashlight,
My duty belt is an Endom “CM” belt with suspenders to help with the weight. Besides the obvious — gun (on a lanyard), and spare magazines, this is where I mount a big knife, a dump pouch, and a Leatherman “MUT” multi-tool. The “big knife” is a “Warrior Spirit” by Chase Axinn in a custom sheath by SagewoodGear. There is a magnesium ferro rod and a metal tin of tinder-quick integrated into the sheath.
Possibles Kit
I stole this great idea from Patrick Smith whose essay I first read back in the 90s. As Patrick described in his essay, the idea is to have ready at hand everything needed to operate efficiently and safely in austere environments. The mountain men of the early 1800s American west called this a “possibles pouch.” This kit is the basic set of tools I may need on the trail plus a minimal survival kit. As Patrick wrote, it is a kit of “items that save my bacon, or just ensure comfort, wherever I roam.”
The container is an Endom “Recon Waist Pack.” Yes, it is a fanny pack. But this thing is great. It attaches to plate carries with MOLLE or PALS webbing, inside larger packs with siamese silk clips, or directly on your waist with the extra-long removable waist belt.
What’s inside:
Fire kit — A small ferro rod and striker, UCO stormproof matches in an EXOTAC Matchcap XL case, homemade tinder-quick, and a Bic lighter in an EXOTAC “fire SLEEVE”
Water — heavy duty zip close bags (to collect and carry) and “PortableAqua” iodine and taste neutralizer tablets; in the winter I add a metal cup; tea bags, instant coffee and “Nuun” tabs are a welcome edition
Light — A Petzl “e+LITE” with a continuous red or white strobe feature (there’s even a whistle built into the head strap), and spare batteries for that, the light on my vest and the light in my pocket
First Aid & Meds — large bandana in bright orange or yellow (doubles as a signal flag), finger nail clippers, superglue, Leatherman Micra (scissors & tweezers), assorted Bandaids and butterfly closures, toilet paper in a zip close bag, dental floss, needles (sew a wound or clothes with the dental floss, pick out splinters, drain a blister), small roll of surgical tape, duct tape, sample packs of Benadryl, ibuprofen, acetaminophen, and packages of “BC Powder”
Other Stuff — clip on the nose reading glasses, button compass, rubber bands (big thick ones like those used to bind broccoli), 3mm cordage (strong enough for building or repair, less bulk than P-cord), P-cord measured as back up boot laces, “SOL Emergency Blanket XL” (orange on one side, reflective silver on the other), snivel gear (gloves, beanie, in the Fall to Spring I add synthetic long top and bottoms and a Patagonia “Puff Ball” jacket with hood), small signal mirror, orange flagging tape, safety pins, paperclips, light weight knife sharpener (“Workshop EDC Pivot PLUS”), and a plastic spork
That’s it. Everything I carry on every operation. Sustainment gear for longer operations — multi-day excursions into the backcountry — require all the usual gear from tents and sleeping systems, to cook-stoves and bear canisters.
A few parting caveats. I developed this list over a 20-year career. Most of that career has been in the Sierra Mountains of California. I also worked Denali in Alaska, Yellowstone in Wyoming, Guadalupe Mountains in Texas, and Everglades in Florida, so I can say by experience this list would need modification depending on your area of operations. I have added and subtracted things over the years when I either had it and constantly didn’t need it or needed it and well, didn’t have it. I suggest you do the same. Remember, travel light and fast, be prepared and active, mission first.